

How To Change Tunes On Edge Cts3
Quick Links

Related Manuals for Edge INSIGHT CTS3
No related manuals
Summary of Contents for Edge INSIGHT CTS3
- Page 2 Table of Contents Read Me Condom Warning & Caution Condom Guidelines FCC Compliance Quick Start In-Cab Brandish Accessories Cable Installation Windshield Mount Installation Touch Screen Principal Menu Update Software Downloading Update Agent 1.0 Production Updates Performance Tests 0-60, 0-100, 1/iv Mile, & 1/8 Mile Tests Settings Brandish &...
-
Page three: Safe Alarm & Caution
Read Me Safety Alert & Caution Throughout this User Manual you will see important letters regarding your safety or the protection of your vehicle. These messages are designated past the words WARNING, CAUTION, or NOTICE. WARNING A Warning indicates a hazardous situation which, if non avoided, will result in decease or serious injury. -
Folio four: Safety Guidelines
Prophylactic Guidelines Alert Before using device, read and understand the user transmission, including these additional safety instructions. Failure to do so could outcome in DEATH or SERIOUS INJURY. • Do not exceed legal speed limits on public roadways. Violating traffic laws is unsafe and could result in injury or vehicle damage or both. -
Page v: Fcc Compliance
Warning: Changes or modifications to this device not expressly approved by Edge Products, LLC could void the user's potency to operate the equipment Notation: This equipment has been tested and found to comply with the limits for a Class B digital device, pursuant to Role 15 of FCC Rules. - Page 6 FCC Compliance Cont'd Cet equipment est conforme aux limites d'exposition aux radiations dans united nations environnement non controle. Cet equipment est en contact direct avex le corps de fifty'utilisateur dans des conditions de fonctionnement normales. Cet emetteur ne doit pas etre co-localisees ou operant en conjunction avec tout autre antenne ou transmetteur.
-
Page 7: Quick First
Quick Outset In-Cab Display LEDs Light Touch Screen Sensor HDMI Port USB Port Mount Receptacle... - Page 8 Accessories Windshield Suction Mount Alcohol Wipe Iso- propyl OBDII to HDMI Cable HDMI OBDII Zip Ties USB Cablevision...
-
Page 9: Cable Installation
Cable Installation ane Locate the OBDII port. The connector is typically plant direct below the driver side dash console. ii Plug the OBDII connector into the vehicle port. 3 Route the HDMI connector up the driver side dash. (On most vehicles, the side console may be removed to betrayal the underside of the nuance for easier routing. -
Page 10: Bear on Screen
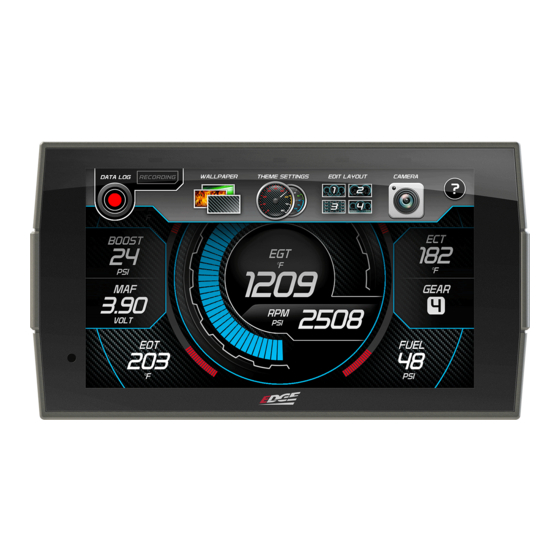
Touch Screen Use these gestures to navigate and control the brandish. Press/Select Vertical Swipe Select options, input val- Drag upward or down menus, and ues, enter menus, etc. scroll through card items. Horizontal Swipe Double Tap Coil through gauge screens Enter sub-menus such as or change option values. - Folio 11 Main Menu The Primary Menu displays each of the card options available on your device. While navigating the menus, you will find the Main Menu icon. Printing this icon to have you straight back to the Chief Menu. To navigate to ane of the 6 menu options, simply select an option icon.
-
Folio 12: Update Software
5 Double-click the Update Agent ane.0 desktop icon. half-dozen Fill out the registration form. 7 Refer to the next page for performing product updates. NOTE: Edge Products makes updates bachelor periodically to add coverage and features. Updates could include a new version of the update software. -
Folio xiii: Production Updates
Production Updates This device has the ability to update via a USB connection or a wireless connection. Refer to the following information for USB updates. Refer to the Check for Updates feature under the Settings department for more than information on wireless updates. 1 Open up the Update Agent one.0 program, located on the desktop. -
Folio fourteen: Operation Tests
Performance Tests 0-60, 0-100, 1/4 Mile, & 1/8 Mile Tests While in the Primary Menu, select the Performance Tests icon. A list of tests will appear. Use the following data to learn more than about each test. 1 Select the Performance TESTS Performance Exam that yous would like to kickoff. - Page 15 From Finish 0 TO 100 iv Switch methods by clicking the middle button. 5 When the vehicle is in place, release the restriction and go along to accelerate. TIP: Select the back button to render to the 00:00 chief menu. Note: In one case the speed has been reached, the test volition stop and the results will be displayed.
-
Folio xvi: Display & Audio Settings
Settings Display & Audio Settings While in the Main Carte du jour, select the Settings icon. A list of settings will announced. This section explains what these settings are and how to use them. ane Select the Display SETTINGS Settings option. Help/Info 2 Alter each setting Brandish Settings by adjusting information technology's... - Page 17 Device Colors Alter and modify device colors for background and borders. 1 Select the Device SETTINGS Colors option. Assist/Info two Select between Display Settings Background Tinting Device Colors Color or Keyline Color Setting according to Sound Settings what is wanting to exist inverse.
- Page xviii Wi-Fi Setup This device is equipped with the ability to connect to and update over a secure Wi-Fi connection. For more than information on how to cheque for updates, refer to the Check for Updates section of this transmission. one Select the Wi-Fi SETTINGS Setup option.
-
Page 19: Cheque For Updates
Check for Updates If the device is connected to Wi-Fi, click this choice to look online for updates. If updates are bachelor, the device will provide the selection to perform the update. i Select the Check SETTINGS for Updates pick. Wi-Fi Setup Annotation: If Wi-Fi is E-mail Setup... -
Page 20: Unit Of Measure
Unit of Mensurate Use this setting to globally modify the device to decide whether it uses Imperial or Metric units. 1 Select the Unit of Measure option. SETTINGS Wi-Fi Setup E-mail Setup Check for Updates 2 Select (Imperial or Unit of measurement of Measure Metric) then hit save. - Page 21 Tire Size Cont'd 1 Select the Tire Size that needs to be modified in the menu. 2 Select the size accordingly and utilise the tabs above for other available options. iii Select Save to salvage any changes and render to the menu or Dorsum to return to the menu with the choice to not...
-
Folio 22: Restore Default Settings
Restore Default Settings Use this setting to restore the device back to the factory settings. NOTE: This will NOT restore your vehicles' factory data or unmarry the tool from your vehicle. 1 Select the Restore SETTINGS Default Settings option. Unit of Measure Restore Default PIDs 2 Printing go on Restore Default Settings... - Page 23 Gauges & Logging Judge Layouts While in the Main Menu, select the Gauges & Logging icon. The offset of 3 gauge layouts will be displayed. To toggle between screen layouts, swipe the screen Left/Right. To edit the Gauge Layouts: ane Open up the pull down bill of fare by swiping downward starting from the top of the screen.
- Folio 24 3 Once the Layout Editor is open, select i of the 3 layouts. TIP: Select the Trash Can icon to delete the current layout settings. TIP: The Reset Layout option resets the layout to the factory default, including pid selections. 4 Toggle through the screen style options by either swiping the image up/down, or selecting the...
-
Folio 25: Theme Settings
Theme Settings Change and change individual gauge element colors & transparency. 1 While the Gauge Screen is in view. Open the pull down menu past swip- ing down starting from the top of the screen. 2 Select Theme Settings. 3 The following editor volition come into view, showing your options. 4 Select Save to utilise the changes. - Folio 26 Wallpaper Change the background paradigm displayed on the device. 1 While the Guess Screen is in view. Open the pull downwardly menu past swiping down starting from the top of the screen. 2 Select Wallpaper. three Toggle through the available background images by either swiping up/ down on the image, or using the upwardly/downward arrows.
-
Page 27: Custom Wallpaper
Custom Wallpaper Add custom wallpapers to be displayed every bit the device groundwork. ane Plug in the device and find the cts3 folder on your PC and open up it like you would a flashdrive. two The cts3 device folder should testify a Backgrounds folder. -
Page 28: Individual Gauge Setup
Individual Gauge Setup Each gauge within a gauge layout tin be modified individually. Settings such as Unit of Measure, PIDs, Alert Settings, & Tick Marks may be modified. PID Selection: 1 While the approximate screen is in view, Double Tap the individual gauge to be modified. - Page 29 Alarm Settings: one Select the icon. 2 Employ the (3) toggle buttons to toggle each option on/off. Alerts On/Off Alarm sounds On/Off TIP: Select the back push Alert On/Off to return to the gauges. 3 To adjust the warning and alert values for the PID, apply the value editors.
- Page thirty Pitch / Scroll G-Force Screen Each CTS3 device gives y'all the pick to check the pitch and roll of your vehicle. 1 While the Estimate Screen is in view. Open up the pull down menu by swiping downward starting from the summit of the screen. 2 Press the Layout Editor and choose which screen you wish to supplant.
- Page 31 four Select Relieve and choose to create or replace a layout. 5 Select Back and when the Gauge Screen is in view, swipe right until yous're on the Pitch / Roll Chiliad-Force Screen. Swiping right or left volition depend on what screen you chose to alter in step 2. Notation: By holding downwards on the pitch / roll gauge for three seconds, you tin level the...
- Page 32 DataViewer Download This windows software allows OBDII data logs that were recorded with the Edge Products tuner to be opened and viewed. This software can be downloaded from the Edge Products website. 1 Go to: world wide web.edgeproducts.com 2 Click the UPDATES tab located at the superlative of the page.
- Page 33 DataViewer After a recording session, unplug the device from the vehicle and follow these instructions. 1 Double-Click the DataViewer icon located on your computer desktop. 2 Connect the device to the PC using a USB connector. iii Select icon and browse to the CTS3 drive.
-
Page 34: Eas Overview
EAS Accessories EAS Overview The CTS3's functionality may be added upon by use of EAS (Expandable Accessary System) devices. The CTS3 automatically connects to any new EAS devices connected to it before information technology boots on, and will alert the user. Upon installation and loading of a new device, the post-obit settings are available: i Display Proper noun: Changing this item will change the proper noun of the... - Page 35 EAS Device Instructions EAS EGT Probe The EAS EGT Probe does not need whatsoever of the pre-defined settings adapted. However, users have the ability to customize it's Name, Description, and/or Display Units. EAS Universal Sensor Input (5 Volt) The EAS Universal Sensor Input provides the ability to read whatsoever 0-five volt signals and translate them into meaningful values for display on the CTS3.
- Page 36 EAS Device Instructions Cont'd Setting upwards a custom sensor (non-EAS): 1 Enter the EAS Settings Menu. 2 Select your Universal Sensor Module (Note: The serial number should lucifer the unit that is connected to the sensor you would like to configure).
- Page 37 EAS Device Instructions Cont'd EAS Ability Switch The EAS Ability Switch allows y'all to control your favorite aftermarket accessories such as lights, air compressors, etc. direct through the CTS3 Upon starting the CTS3 for the first fourth dimension with the EAS device installed, you lot may go straight to changing Switch settings, or you may opt to get to the home menu and navigate to the EAS Settings Menu at any time after to change the Switch Names and Descriptions.
-
Page 38: Problem Codes
Diagnostics Trouble Codes While in the Main Carte, select the Diagnostics icon. The trouble codes screen volition announced. If any codes have been initiated, they will show in the listing equally a P####. Note: Trouble codes are created when an effect is detected past vehicle sensors. -
Page 39: Manual Regeneration
Manual Regeneration If you vehicle supports Manual Regeneration, there will exist a menu choice in the Diagnostics Carte of the device. Annotation: Sure operating conditions are required for Manual Regen to operate. There could exist, merely non express to; Engine Coolant Temp, Engine Oil Temp, Vehicle Speed, etc. -
Page 40: Injector Balance Rates
Mobile Regeneration 1 Open the Diaganos- tics Carte past swiping upwards from the Gauge Screen and selecting Diagnostics. 2 Select Transmission Regen. 3 Follow the on-screen prompts to enable Transmission Regen. Injector Balance Rates Injector Balance Rates (Duramax Only) 1 To view Injector Balance Rates on your GM Duramax, enter the Diagnostics Menu. -
Page 41: Device Info
Help/Info Device Info While in the Main Menu, select the Settings icon, and open the Help/Info Option. The device info described below assists our Tech Support team when support is needed. HELP/INFO Device Info Enter License Codes Tutorials TIP: Select Exit to F.A.Q'due south return to the chief menu. - Page 42 Tutorials All of the available tutorials are stored hither and tin can be accessed at whatever time. 1 Select the Tutorials option. Aid/INFO Device Info 2 View each tutorial by swiping left/correct. Tutorials F.A.Q's iii Select Continue to Tech Back up return to the Aid/Info menu.
-
Page 43: Tech Support
Tech Support This option is to be used only when Tech Support requests information. NOTE: When a menu detail is selected, a set of "keys" will be given. Tech Support will use these keys to produce a code that you volition utilise to admission the carte du jour items functionality. - Page 44 world wide web.edgeproducts.com For more data contact our Technical Back up team: (801) 476-3343 6:00 am - v:00 pm MST tech@edgeproducts.com To expedite your support, please accept your Vehicle Information, Role Number, and Serial Number set prior to contacting us. Copyright© 2020 D10023800 Rev00 04/20/2020...
Source: https://www.manualslib.com/manual/1812291/Edge-Insight-Cts3.html
0 Response to "How To Change Tunes On Edge Cts3"
Post a Comment